How to get your entire team prototyping with AI
How to get your entire team prototyping with AIA guide to creating AI prototypes that match your brand and are integrated into every step of your development lifecycle👋 Welcome to a 🔒 subscriber-only edition 🔒 of my weekly newsletter. Each week I tackle reader questions about building product, driving growth, and accelerating your career. For more: Lenny’s Podcast | How I AI | Lennybot | Lenny’s Reads | Courses | Swag Annual subscribers now get a free year of Bolt, Perplexity Pro, Notion, Superhuman, Linear, Granola, and more. Subscribe now. Colin Matthews holds the distinct honor of having not one but two posts in my top 10 most popular posts of all time. Today he’s back with a post that I suspect will make it three. I love Colin’s stuff because it’s always rooted in the real-life problems that product builders actually run into with AI tools—and he articulates the solutions so simply and practically. I’m excited to keep collaborating with him to help us all learn how to go from hype to reality. Let’s get into it. For more from Colin, check out his free 45-minute live online class coming up on July 8th, and his course AI Prototyping for Product Managers (which kicks off on June 30th; use code LENNYSLIST to get $100 off). You can also book Colin for one-day team workshops with your team. P.S. If you prefer, you can listen to this post in convenient podcast form: Spotify / Apple / YouTube.
Since I first shared a guide to AI prototyping for product managers in January, AI prototyping tools have become immensely popular. It’s now more common than not for product teams to use v0, Bolt, Replit, or Lovable to build a quick prototype to share their ideas and get feedback. After having taught more than 500 PMs over the past five months how to get the best out of these tools (along with another 10,000 in numerous free online lightning lessons), I’ve seen two questions come up most often when people try to use these tools in real life:
These common questions are the reasons product, design, and engineering teams are struggling to figure out team workflows for AI tools. Without handoff guidance or high-quality prototypes, AI prototyping is left to explorations and experiments, which are hard to operationalize and scale. In this post, I’ll walk you through three ways to create component libraries that consistently create great mocks; team workflows to reduce rework; and a step-by-step guide on how prototypes should be used. I’ll also give you plenty of time-, token-, and headache-saving tricks for most popular AI prototyping tools. I’ll be including v0, Bolt, Cursor, and Magic Patterns in this post, but these techniques work with any AI prototyping tool. To give you a quick example of what’s possible, here’s an Airbnb prototype I built with a single prompt: “Build a homepage and a listing details page.”
Let’s get started! Component librariesComponent libraries are the first big improvement you can bring to your team. They allow you to maintain branding and consistent styling without having to manually clean up each prototype to look like your product. Building a component library will take some up-front effort, but you’re also building reusable assets that will greatly improve the quality of your prototypes going forward and save you time after the initial investment. There are three different approaches to building component libraries with AI prototyping tools, with different advantages and tradeoffs in effort and output:
Let’s go through each and discuss their tradeoffs. Method 1: ScreenshotsScreenshots are the easiest way to start building a component library. You don’t need any technical expertise, and this approach works with any tool. Start by prompting your favorite AI prototyping tool with the following:
Let’s give this a try with v0, re-creating a Google Calendar UI. Remember to include a screenshot!
Here’s our initial result:
One quick note: You may end up with a reproduction of the screenshot instead of a list of components. These AI tools are very tuned to reproduce screenshots, so you may need to push it with one more prompt, like “Instead of showing me a page that re-creates the UI, the index page should be a list of components in the component library.”
This technique (called reflection) makes it easy to leverage the AI to quickly make UX improvements. Once you have your component library complete, pause! You’ll want to create a fork of the project and start to use your components in a new project. Your forked project will automatically reuse your components to assemble your design like Legos. Again, this technique works in any of your favorite AI prototyping tools. (Here’s how to create a fork in each AI prototyping tool: Bolt, v0, Lovable, Replit, Magic Patterns.) For example, we can prototype an AI agent in Google Calendar that blocks deep-work slots with a simple prompt like “Create a Google Calendar main page view that has an AI scheduling assistant to recommend deep-work blocks.” Here’s the result:
Spending time to improve your components is worth it. Every prototype made using them has better visual quality, is less distracting to stakeholders, and allows conversations to focus on the specific elements that are being tested. Method 2: Chrome extensionsThe next option for creating component libraries is to use Chrome extensions. As of today, Magic Patterns is the only tool that supports extracting components from a webpage directly. Using the extension is simple: Select a UI element, extract its styling, and turn it into a reusable component.
I like to fire off multiple of these extracts at the same time to create as many components as I can in a short period of time. Once they land in Magic Patterns, you can continue to prompt your way through refinements. The real magic comes in using these components. Let’s try the prompt “Build me a channel view of YouTube.” Here’s the result from a single prompt:
Method 3: CodeThe last way to build a component library is with code, using your real components. This approach requires the most effort but will provide you with prototypes that are indistinguishable from your real product. You’ll need assistance from engineering, and the overall effort and complexity will depend on your codebase and company size. This option is most realistic in smaller companies or those with more technical designers and PMs. To start, your engineering team will need to set up the repository so you can run the front-end application locally without having to connect to any back-end services or databases. This can be accomplished by creating a new entry point for the client-side app that mocks up the API responses. Once you have your local environment running, you can use an AI code editor like Cursor or Windsurf to prototype. Here’s an example of an app I’m working on. All of the information you see is mocked up client-side, with no servers or databases connected.  This approach works best if you’re comfortable with GitHub, branches, and running basic terminal commands. Another way to leverage code to get more accurate components is with the new Figma MCP server (which just launched last week!). In case you’re unfamiliar, MCP is a protocol that allows AI agents to retrieve information or take actions in another application. In this case, we can use the Cursor agent to make calls to Figma’s MCP server to retrieve detailed styling information, and then transform that into components. Figma currently supports four MCP actions:
This effectively gives Cursor the ability to autonomously take screenshots, extract design tokens, and get CSS from Figma’s Dev Mode. Here’s a quick side-by-side of a Figma design library and the same components reproduced in code. Figma:
Code:
Here are the steps to build your components using Figma MCP:
So far, I’ve found this works best if you have existing components Cursor can mimic, or provide clear instructions for how the code should be formatted. This option is very new but also very exciting for design teams who want to leverage their existing component libraries with AI prototyping tools. To summarize, component libraries give your team a set of shared artifacts that make it easy for anyone to create realistic prototypes with AI. Your component library can be shared across your entire team, making it easy to onboard new team members and maintain high-quality visuals for testing directly with customers or in meetings with senior stakeholders. Team workflowsNow that you have components to help you create realistic prototypes in a flash, let’s talk about team workflows. There are two workflows I want to cover:
Workflow 1: Baselines and forksBaselines and forks are an extension of the component libraries strategy. With components, you’re giving team members a head start by providing building blocks they can easily assemble into good-looking prototypes. “Baselines” go one step further, giving you a high-quality reproduction of your current product experience, allowing your team members to more easily experiment with new ideas using simple prompts. Forks build on this further, allowing you to duplicate a project and all of its contents without using any tokens, and keep you from screwing up your baseline.
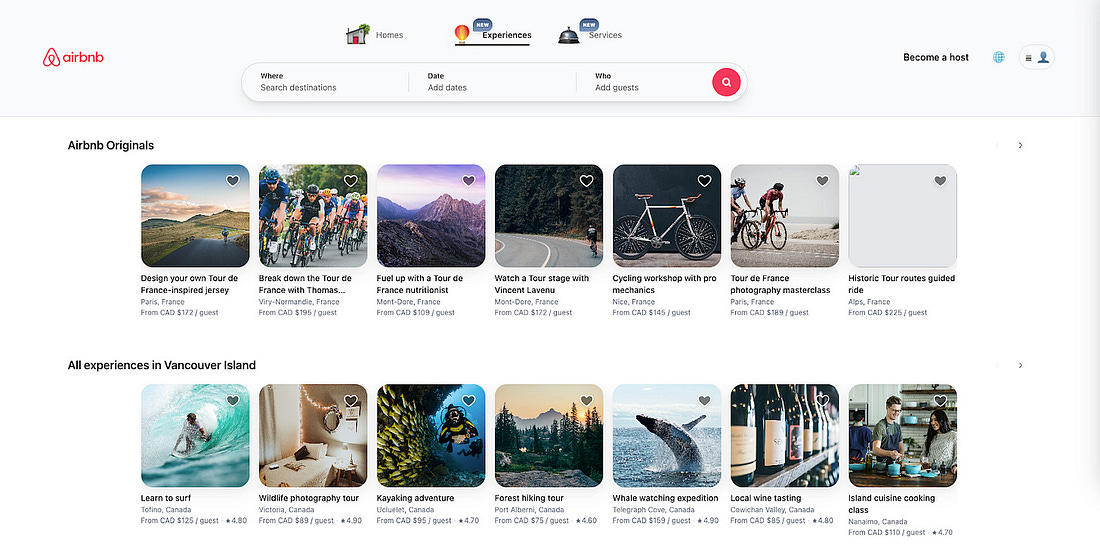
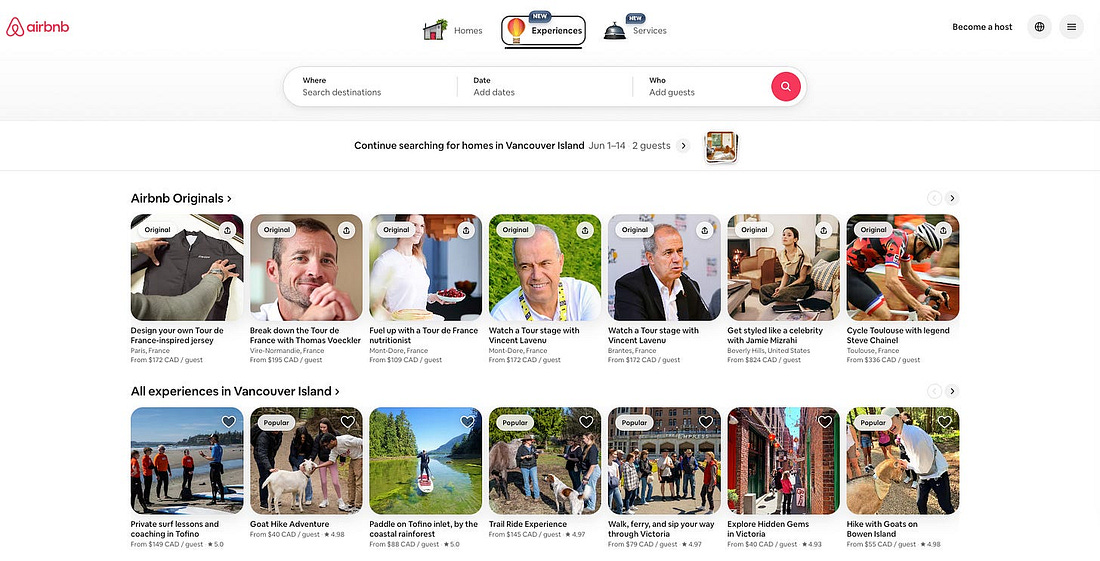
This is best explained with an example. Let’s say I’m the PM at Airbnb working on the new Experiences product. This is a product that features the most unique and interesting experiences around the world. Using baselines and forks, I’ll start by reproducing the current page and then explore a few new ideas. Creating the initial page with my component library took me about 20 minutes, mostly ironing out all the little details to make the prototype really look like Airbnb (see my previous guide for advice on fine-tuning your prototypes). Here’s how it looks:
By the way, here’s the real site:
Now that I have this page, I’ll treat it as my “baseline.” I won’t make any more changes and instead create a fork. On the fork, I’ll enter a single prompt: “Modify this page so that it runs through a questionnaire to determine experiences that I would like before showing me experiences. Maintain the Airbnb branding.”
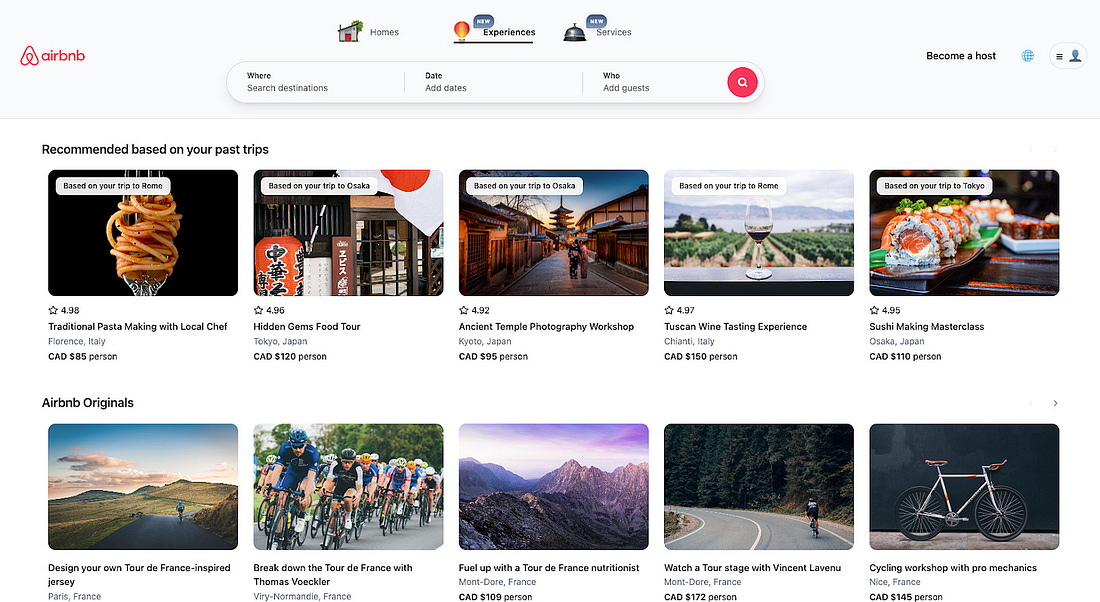
Now let’s test another idea: using the customer’s past travel history to suggest relevant experiences. Again, I create a fork from the baseline. On the new copy, I prompt, “Modify this page so it shows me experiences I would like based on my past travel history with Airbnb. For each recommendation, add a UI element that says ‘based on your trip to. . .” Here’s the result:
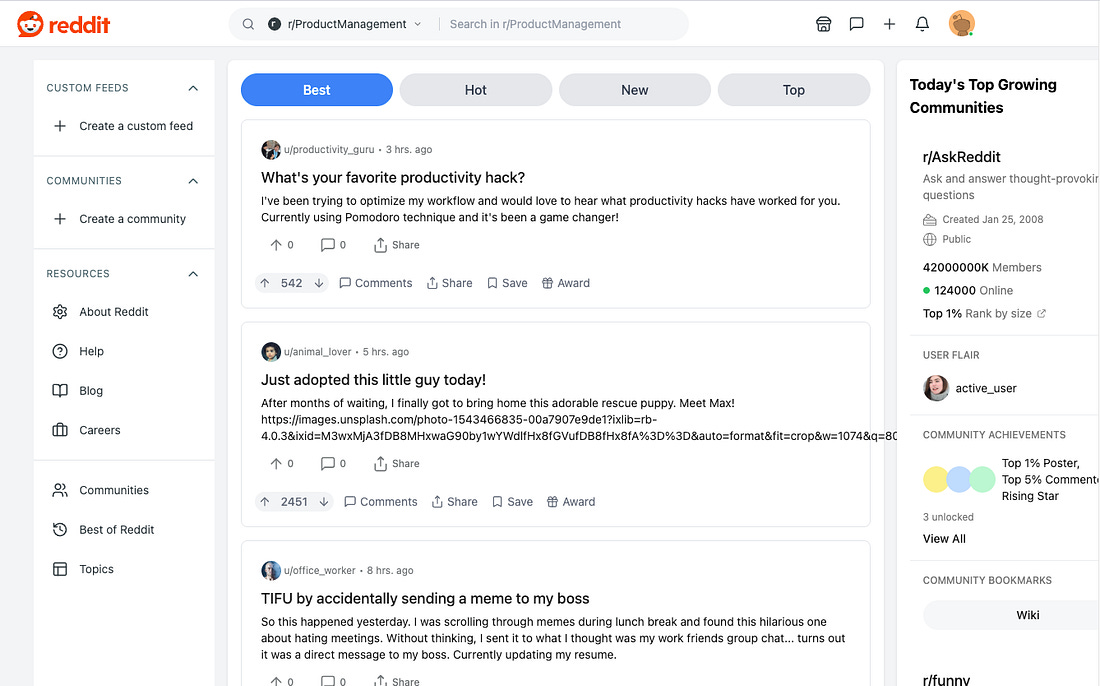
Baselines and forks are best used when you want to explore multiple different ideas without having to rebuild the starting page each time. They provide your team with another leg up in getting high-quality results quickly when using AI prototyping tools. Workflow 2: Product development lifecycleIf you implement everything we’ve covered so far, you’ll be dramatically ahead of the average AI prototyping noob. But it’s very possible that your PMs or designers will still prototype in isolation. Creating a shared understanding for your team for when to use AI prototypes is just as important as knowing how to get good results. Before we get into the product development lifecycle, I want to briefly touch on fidelity. For a long time, we’ve had low-fidelity scratch-pad versions of UIs, and high-fidelity mocks for the polished finished product. AI prototyping introduces medium fidelity—better than a napkin drawing but still not as good as your finalized Figma mocks. Here’s an example of a mid-fi mock of Reddit. At first glance, it seems correct, but you’ll notice lots of imperfections, like two buttons for upvoting, too much padding on the left navigation, and the top right navigation items being pushed in too far from the right edge.
You can also definitely create high-fi mocks with AI prototyping tools—the key is how much time and effort you put into them. It’s critically important to choose the appropriate fidelity for your prototype based on the context, and then set clear expectations with team members around that level of fidelity. For example, if you’re explaining an interaction to an engineer, mid-fi is totally fine, and it’s a waste of time to push past that. Whereas if you’re pitching your CEO on funding a new team that will require millions in new investment, a functional high-fi mock is probably worth the time. Below, I’ve outlined the six main steps in the product development lifecycle and how prototypes can be leveraged, as well as what fidelity they should be and who is responsible for the prototype. I encourage you to take this as general guidance and apply what makes sense in your own company.
Let’s walk through an example of the full development lifecycle for a new feature at Reddit called Reddit Answers. This will be a gen AI feature that allows users to ask questions and get quick answers based on past Reddit posts and comments. Step 1: DiscoveryStarting in Discovery, you may choose to use an AI prototyping tool to quickly express an idea in medium fidelity. This is typically used only internally, and may just be between product, design, and your engineering lead. We might start out with something like this, which should take only about 20 minutes:
This is a great asset for internal communication, but we probably wouldn’t want to show this off to any executives or customers. By the way, here’s the prompt that generated this prototype:
Step 2: Roadmap and alignmentOnce we’ve firmed up the idea and want to build more buy-in internally, we likely want to put something together in high fidelity that we can show stakeholders and customers. We’ll refine our initial prototype, use our component library, and come out with a much more polished prototype. This can take anywhere from 20 to 60 minutes, depending on the complexity of your prototype.
Step 3: PRD and mocksNow that we have buy-in to build this new feature, we need to figure out exactly how it will work. We can include the prior high-fidelity prototype inside the PRD and demo it live to the team to start generating questions and working out edge cases. We might hear things like:
Using the prototype for communication is a much faster and easier way to drive these important conversations than hoping an engineer reads your whole PRD and adds a comment or two. This conversation with engineering will likely take two hours or more across a few discussions. Step 4: User interviewsAs we’re continuing to iterate on the idea, we can bring our high-fidelity prototype with us to user interviews. We can get feedback on the exact user flows very early in the development cycle instead of waiting for the feature to be ready in production. User interviews will likely take you three to five days to collect enough feedback. Although direct user interviews are likely the best way to gather feedback, we can also scale our feedback collection with surveys. You can embed your favorite survey tools directly into the prototype to collect structured feedback by sharing it with actual users.
Step 5: Engineering scoping and deliveryIt’s important to remember that the code generated by AI prototyping tools is mostly useless to your engineering team (unless your components are built using your existing code). It doesn’t follow any of the existing patterns, use any of the same libraries, or may not even be written in the same programming language. Some ways the prototype can be useful are for documenting very specific interactions, like animations. If you want the loading animation to be exactly what you created in the prototype, your engineering team can likely use that as a head start during implementation. Throughout the building process, the high-fidelity prototype can still continue to be a useful communication tool any time there are questions about aspects of the product or feature. Prototyping doesn’t really impact development timelines, so expect two to six weeks, depending on the complexity of the feature. Bonus tip: Using your actual logo in prototypesThis section is quick but super-important, because I see a lot of people run into this challenge. Most AI prototyping tools would rather draw an uncanny-valley version of your logo than use the real thing. With all the other small UI mistakes they make, this often makes the prototype feel unusable when presenting to customers or senior stakeholders. The simple solution to this is to paste in a link to the exact image you want to use. There are two ways to find that logo URL:
Starting by grabbing the image directly, we can inspect the site and click on the logo. This image is an SVG, meaning there is no link to copy. We can instead copy the SVG content and paste that into our preferred AI tool.
Here’s the result in Bolt with a simple request to build a homepage:
To include your logo, simply paste the link or SVG text with a prompt like “Add my logo to the header using this link.” The second option is to look up the logo on a site like Brandfetch and copy the embed link. Paste that directly into your AI prototyping tool and you’ll get a clean logo instantly.
As you’d expect, this looks identical:
You can use these approaches for any images you want to include—just make sure you’re linking to the image itself, not a webpage. The URL will typically end in PNG or SVG. One last tip: If you need some realistic images for your prototype, just ask the AI tool to grab them from Unsplash, which does a reasonably good job at picking relevant images. Here’s the Airbnb example once more, where the AI decided on these images based on the prompt “Add images from Unsplash that make sense given the context.”
Where to go from hereIf you want to drive adoption on your team, start with component libraries to establish visual consistency, implement baselines and forks to accelerate iteration, and align your team on when and how to use different fidelity levels throughout your product development lifecycle. These aren’t merely nice-to-haves—this is what separates teams just poking at the surface of what AI can do for them from those fully integrating AI tools into their best practices and daily workflows to supercharge their products. Give these workflows a try, and feel free to reach out with your progress. I’m excited to see you and your team level up with AI prototyping! Thanks, Colin! For more from Colin, check out his free 45-minute live online class coming up on July 8th, and his course AI Prototyping for Product Managers (which kicks off on June 30th; use code LENNYSLIST to get $100 off). You can also book Colin for one-day team workshops with your team. Have a fulfilling and productive week 🙏 If you’re finding this newsletter valuable, share it with a friend, and consider subscribing if you haven’t already. There are group discounts, gift options, and referral bonuses available. Sincerely, Lenny 👋
Invite your friends and earn rewardsIf you enjoy Lenny's Newsletter, share it with your friends and earn rewards when they subscribe.
|


Similar newsletters
There are other similar shared emails that you might be interested in: